Sunday, January 20, 2013

Apple DVI-ADC Adapter Project

Like many of other I also fall into the problem: loving old computers and collecting them is nice but sometimes causing problems. Old technologies without any support and often incompatible connectors and solutions. Like the Apple Cinema Displays with ADC connectors.
Apple Cinema Display 17 inch

Oh, yes, the problem is: there are no ADC-ready computers (video cards) available today. Apple used the ADC connectors between July 2000 and June 2004. I've thought I could buy a DVI-ADC adapter and use my vintage Mac Mini and the same aged Apple Cinema Display.
But this little thing is still over 100€! (Sometimes Amazon sells over 300$...)
To be clean: Apple DVI-ADC is not only connector conversion from one format to another. No. The ADC gives the power and USB to the monitors too.
Apple DVI to ADC adapter
I decided to build this adapter by myself. I found the project won't be complicate but to find ADC connector is not so easy.
The list what I need to buy before do anything:
  • ADC connector (female)
  • DVI connector (female)
  • USB Type-B connector
  • some kind of power connector
  • Power Adapter from 230V to 24.5V 2.5A
  • Testing PCB
After a hard research I find only one (!) company in the World who still sells ADC connector. This is Surplus Sales of Nebraska


Sunday, January 8, 2012

The NCCP software environment - Debian install and prepare

The NCCP software architecture is not so complicated. It has an operating system, few drivers and the user software. In this post I will explain what kind of operating system I choose and show how it is configured. Everything is basic, nothing is extra.
First of all, I chose the Debian Squeeze version with the actually default kernel (for my hardware) and this is the 2.6.32-5-486.
Let's go, do it:
  1. Download the Debian NetInstall CD image from here. (Direct link to the i386 iso file.)
  2. Burn to a CD
  3. Boot up the hardware from the CD. (Need to play a little bit in the BIOS to set the first boot device to the CD-ROM)
  4. Set up the default system.
Do not forget to enable the root user during the installation process and create a standard user as well. 
Of course — because this is a net(work) installation, it needs a living internet access. I just connected to my home's rooter with a LAN cable. Up to the internet connection's speed, the network install takes a half an hour.
You could ask why I choose the network install for my setup. Because I always want to reduce the amount of computer components on my desk. This tiny VIA board is nice and small and not so nice looking together with an 1€ CD-ROM driver on its side. (Did I told already all of my components are low-cost stuffs?) This old CD drive is loud and always shaking my desk when it needs to read something from the disk. That's why I decided to use as less as need.
After the basic Debian setup, need to tune a little bit the system to be ready to set the kernel source dependencies and compile the driver for the Sitecom USB WiFi adapter.
  1. Download and install Midnight Commander
  2. Download and install ssh
  3. Download the kernel-package
  4. Download the kernel source for the actual kernel
  5. Download and install the kernel headers (They are important to build any driver.)
# apt-get update
# apt-get install mc
# apt-get install ssh
# apt-get install kernel-package


If you did not select during the installation add contrib and non-free to your source.list file. This file is in the /etc/apt/ directory of the root filesystem. Here is mine:


# deb cdrom:[Debian GNU/Linux 6.0.3 _Squeeze_ - Official i386 NETINST Binary-1 20111008-19:55]/ squeeze main
#deb cdrom:[Debian GNU/Linux 6.0.3 _Squeeze_ - Official i386 NETINST Binary-1 20111008-19:55]/ squeeze main


deb http://debian.tu-bs.de/debian/ squeeze main contrib non-free
deb-src http://debian.tu-bs.de/debian/ squeeze main 


deb http://security.debian.org/ squeeze/updates main
deb-src http://security.debian.org/ squeeze/updates main


# squeeze-updates, previously known as 'volatile'
deb http://debian.tu-bs.de/debian/ squeeze-updates main
deb-src http://debian.tu-bs.de/debian/ squeeze-updates main


To have a "ready" kernel sources and headers need to do this few steps.
Download the kernel headers and source packages:
# apt-get install linux-source-2.6.32
# apt-get install linux-headers-2.6.32-5-486

Unpack it:
# cd /usr/src
# tar -xjvf linux-source-2.6.32.tar.bz2

Install the correct config-file:
# cd linux-source-2.6.32
# cp /boot/config-2.6.32-5-486 .config

Generate dependencies and Makefiles:
# make-kpkg --append-to-version "-5-486" --revision 2.6.32-5 --config old configure

Check build link:
# rm -f /lib/modules/2.6.32-5-486/build 
# ln -s /usr/src/linux-source-2.6.32 /lib/modules/2.6.32-5-486/build
Most drivers will use the build link to find the correct kernel source tree for include files and Makefiles.
With this in place many drivers can be installed with a simple “make install”.

Very big thanks to here and here.

Because I have not so much free space on my CF card, I decided to delete all of the unnecessary files and packages:
# cd /usr/src
# rm linux-source-2.6.32.tar.bz2
# apt-get clean

Two usefull commands are the df and the free.

The NCCP Hardware

As I decided to buy few old mini PC and tune them up to my needs, I jumped into the eBay listings to find that main board what fits to my requirements:


  • Mini or micro ITX board
  • Has to have USB 2
  • Has to have serial port
  • Intel compatible CPU
  • Standard IDE-44 for my HDD replacement
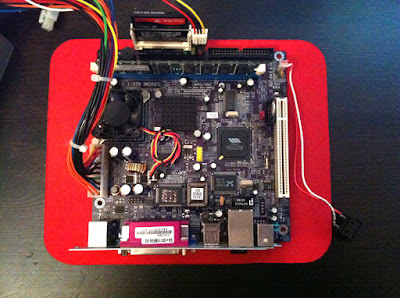
I don't remember the search criteria but I find — from the same guy — two nearly the same VIA Epia boards. Of course they are not new. That's why they were cheap both together 56€!


These are the pictures from the eBay listings:


Don't worry, I won't use this ugly big rack-ready house in my car. The configurations are very similar, just have a short look:


Mini ITX VIA EPIA C3 533MHz 256MB 32MB IDE Flash Module, 200W ATX Power Supply
  • VIA EPIA Mini ITX Mainboard
  • VIA C3 CPU 533MHz
  • LAN, VGA onbaord
  • 256MB RAM
  • Transcend 32MB IDE Flash Module
  • 200W ATX Power Supply,  Wintech WIN-200PS+PFC


LACIE 1U Mini ITX 30cm width VIA EPIA C3 800MHz C3VCM6 256MB 32MB IDE Flash Module
  • VIA EPIA C3VCM6, Mini ITX Mainboard
  • VIA C3 CPU 800MHz
  • LAN, VGA onbaord
  • 256 MB PC2100 DDR RAM
  • 32MB IDE Flash Module
  • 3COM 3C905B-TX PCI 10/100
I had already in my drawer a 2GB CF and I had to buy an adapter to be able to use with IDE-44.
The USB WiFi module is from Sitecom, WLA-1001. I had lot of complication with this little bastard later. This was too new model for my Linux Kernel. But finally it is working fine.

...and this is the final hardware configuration with 512MB RAM:


Nissan Car Computer Project - NCCP


I bought a Nissan Micra K11 few month ago and I thought I would develop something — and set up in the car — what is able to communicate with my iPhone 4.
I didn't really think about to search something ready product on the market. It was clear from the beginning I would like to develop it by myself.
It is sure all of the data is available over the standard OBD connector what my car has, "just" I need to develop (set up) the hardware what is able to read out from the car's computer and supply them to my phone over wireless connection.


First, I thought I would like to use a little "just-what-I-need" hardware from Arduino and an operating system designed for that minimalistic hardware. 
This hardware is not really so minimalistic how you would think because I need RS232, WiFi, strong CPU and 256MB RAM. This configuration would be necessary because I'd like to use some kind of web service to supply the data to my iPhone. Wireless because Apple reduced the bluetooth communication just for the headsets and no data communication available over the bluetooth layer.
Well, totally new hardware, new OS (I need to compile my Linux based OS for my Arduino board), develop the user software to this specialized environment... no. This would be just sucks - I thought. And the another stuff is this project has to be low-costed, everything has to be as cheap as possible.


I decided fast — buy some cheap and small PC on eBay, tune it a bit, drop a Debian on it with Apache and Tomcat, develop a JNI module for RS232 and then a web service for Tomcat. Done. That's it. Oh yeah!


I thought. 
No, it is not that easy. Because when I dive into the system structure I've seen already where my system going far from the standard desktop configuration, just a fast summary:

  • No hard-disk, CF card instead with IDE adapter
  • No ATX power supply, DC-DC ITX car PC power supply instead
  • No built-in wifi, USB dongle

Of course, I could buy a Car Computer with XY GHz CPU with a lot's of RAM and built-in WiFi but they're very expensive! Over 500€.


Over the next posts I'll explain how is my hardware were grown and how I had a fight with Debian and my crunchy new Sitecom USB WiFi module.